botanyspeaking

Archive for 2010|Yearly archive page

Liking Lichens

In science plants on December 15, 2010 at 11:24 am

One of my favorite websites and news programs SciFri recently ran a story on lichens.

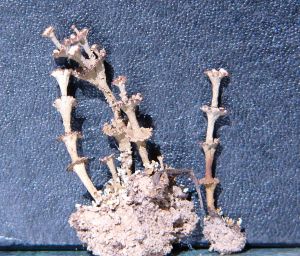
Shown is a an exceptional variety that I collected near Shearon-Harris lake in North Carolina. This one particularly impressed me because of its extraordinary 3D structure. I believe it is Claudonia verticillata. This variety is included in the fruticose class. Many that you see everyday are crustose lichens, growing on the bark of trees. Particularly with North Red Oak  bark, which seems to support lichen growth very well, one can get lost gazing at the beauty that the lichen colorization adds to the bark. I’ve always want to somehow replicate that particular combination as a floor pattern for my kitchen.

Lichens are the classic example of a symbiotic species. A fungus provides habitat for a blue-green algae (or bacterium depending on your point of view) which provides yummy sugars for the fungus through photosynthesis. Scientist have recently found that another bacterium is in on the party.

Lichens are important primary producers in poor environments. Lichens are the first plants to grow on exposed rock. As they grow, their acidic secretions decompose the rock into soil so that less hardy species like moss can grow.

In the tundra a bearded lichen is prevalent and is the main food of reindeer. So when Santa comes this year, you might consider adding a little lichen to that reindeer food you leave out on Christmas eve.

Worms Worms Worms!

In Farming, Gardening on October 26, 2010 at 5:50 pm

© 2010 Sharon Settlage.  All rights reserved.

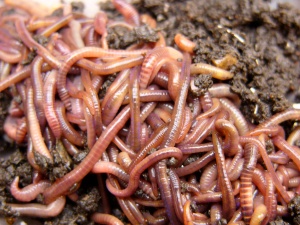
Growing Red Wiggler Worms for Composting – Local Raleigh readers: pick up the March/April issue of Triangle Gardening to see my article on worm composting, with quotes from Susan Quinby-Honer–Raleigh’s original “worm lady” and owner of Red hen Enterprises.

Worms are kept in a 10 gallon Rubbermaid container with 1/8 inch holes drilled into the sides and bottom. This container is placed into another 10 gallon Rubbermaid that contains a layer of newspaper. The lower container will catch the leachate, or the liquid that drains from the composting process. About once per week check the lower bin for escaped worms and drain out the liquid.

The worm bin is made in layers:

  1. About 2 inches of shredded newspaper and/or cardboard
  2. Worms, starter compost and rotting vegetables
  3. About 2 or 3 inches of shredded newspaper and/or cardboard on top.

When adding food, pull back the upper layer of newspaper, put in the food and return the covering newspaper.

At the beginning, add food to one side of the bin only, that way you can see how fast the worms are eating the food. Keep adding food to the one side until it is full, then start adding food to the other side. The worms will move out of the finished food into the new food.

Things to put in the bin:

Any vegetable or fruit

Coffee grounds, tea bags

Paper towels

Dog hair

Shredded newspaper

Shredded cardboard

Stale bread

Non-greasy left-overs

No meat

The finished worm castings are great fertilizer for your garden. Also try making worm tea as a fertilizer and spray to kill bugs on plants in the garden.
I copied this recipe for tea from the Internet:

(http://www.yelmworms.com/Newsletters/June%202006%20Newsletter.htm)


Worm Tea Recipe

In our last newsletter we talked about the whats, whys, and hows of worm tea.  Here is a recipe for you to brew your own:

8-10 cups Earthworm Castings

¼ cup sulfur free molasses

4+ gallons Chlorine free water

(Note:  If you have chlorinated water, fill your pail and let it sit overnight uncovered, and the chlorine will evaporate.  Alternatively, accelerate the process by putting the water in your brewer and turning the bubbler on.  You will know the chlorine is gone when you cannot smell the chlorine anymore – probably in as short a time as 20-30 minutes.  You can verify the absence of chlorine by purchasing a simple chlorine test kit from a local pool supplier.)

Tea Brewer components:

Min. 5 gallon plastic pail

Air pump with air stone or some other air dispersal device.

(can buy in aquarium dept at Walmart)

Sieve (a paint filter will do)

First, ensure that all components are clean and there are no buildups or areas of your brewer that will prevent the circulation of air and water.

In a 5 gallon pail, fill with 4 gallons or so of warm water with the molasses.  Place the airstone or other bubbler at the bottom of the pail and turn it on.  For best results, open brew by placing the Earthworm Castings directly into the water.  (You can strain the castings later if you are going to use a sprayer for worm tea application.)  Alternatively, place the Earthworm Castings into a filter and place into the pail over the bubbler.

Brew until a noticeable frothy slime (“bio-slime”) develops on the surface of the water and the smell of the ingredients is no longer present.  The absence of molasses odor indicates that the microorganisms have consumed the ingredients!  Once the food is gone, populations will begin to decrease.  On these warm summer days, you can begin a brew in the evening, and the tea will be ready for application the next morning.  We find brewing is complete in as little as 12 hours if the brew is kept warm.  However, brew times are heavily dependent on the water temperature.  With every 10 degree F drop in temperature, brew times increase by 12 hours.

Be sure to keep the tea aerobic by leaving the bubbler on until you use the tea.

While brewing, the population of beneficial microorganisms are doubling in as little as 20 minutes.  By the end of the brew, your solution can contain over one billion little critters per teaspoon of tea!

Apply the tea when the populations of microorganisms are at their largest numbers.  Spray the tea onto foliage, stems, roots and surrounding soil, or simply pour it onto you plants and vegetation.  Remember, Worm Tea Everything! Spray early morning or in the evening or in the shade, not in the sunshine.

When you are finished, use the castings for your soil amendment needs.  Do not discard them!  These castings should have higher population densities than what you started with, because remember, you brewed an exceedingly large population, and they will adhere to the castings!

Websites:

http://www.wikihow.com/Make-Your-Own-Worm-Compost-System

http://www.redwormcomposting.com/

If you like this post please leave a comment!

Thank you for viewing!
Sustainable Farming is for you too!

In Farming, Gardening on October 26, 2010 at 5:41 pm

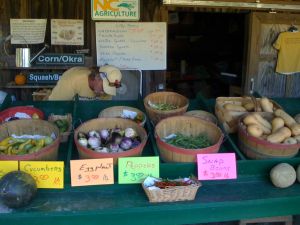
Hill Top Farms Produce StandMaybe it’s because of the economic downturn. Perhaps it’s the increased publicity about local foods. For whatever reason, more people are realizing the joy of picking a freshly grown tomato or cucumber from their own garden. They know where it’s been, they knew it when it was a tiny seedling, and they especially relish its tastiness, still warm from the garden.

If keeping a small garden is not possible, a family can participate in a CSA or community supported agriculture, in which a local grower agrees to provide fresh produce throughout the growing season.

CSA members can opt to trade labor for food at Hill Top Farms, where Fred Miller, his wife Virginia, and black-Labrador Boomer, farm about 15 acres for community agriculture. They provide fresh, USDA certified organic vegetables to a 175-member CSA, farmers markets and local restaurants. Fred was not always a farmer; previously he managed sales for an office equipment company. He left his white-collar job to become a full-time farmer 6 years ago. Hilltop also supports a herd of goats, a flock of chickens, and horse boarding on land originally given to the family through a grant from King George II in 1740. This sandy-loam soil has sustained tobacco and other crops for much of these 270 years.

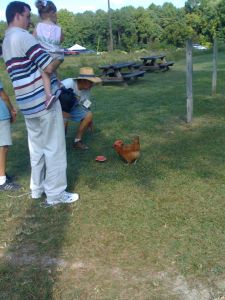
About 1500 people visited Hill Top and other homegrown farms during the Eastern Triangle Farm tour, held the last weekend of this past summer. Some brought their children to enjoy seeing livestock. Others were curious about perhaps starting their own farms.

A few of these visitors may choose to follow the path of Fred Miller at Hill Top Farms, leaving traffic-congested commutes to run specialty farms. It is possible to make a living on a small 2-acre farm, says Sun Butler, manager of the Inter-Faith Food Shuttle Farm. Evan Folds, with Progressive Gardens, verified that one could net $30,000 to $60,000 per year on an efficiently run, diversely planted, organic vegetable farm.

Planting diversity is important for making a profit. Yields depend on the weather. For example, the summer of 2010 in North Carolina broke heat records. Some crops thrived, like the southern delicacies purple hull peas and okra. Southerners clamor for these vegetables, and a good season means good profits to the farmer.

The Interfaith food Shuttle Farm is a teaching farm, in addition to its major role of providing fresh produce to the needy. It is located in south Raleigh, convenient to NC State University, which provides interns and brings classes to learn about the operation of the specialty farm.

During the Farm Tour, Sun Butler lead visitors down weed free rows of pungent smelling pepper plants, fruit laden tomato plants, and flowers covered in butterflies and bees. In the distance, a group of teenagers in a community service program prepared ground for future crops by digging compost into the already loose soil. For some of these city youth, this may be their only chance to commune with nature, and get community service credit to boot!

Sun was in his teaching mode as he pointed out methods used at the Shuttle Farm that lead to profit on only 1 to 2 acres. An unheated hoop-house and row covers, push the growing season to 9 to 10 months out of the year. Gourmet lettuce and herbs can continue to be grown in a hoop house after a frost, when the price of basil shoots up. Drip irrigation and the use of compost minimize fertilizer and water costs.

As he showed us the Shuttle Farm’s vermicomposting systems, Sun also discussed former basketball player turned urban farmer, Will Allen. Allen converted a derelict former nursery in urban Milwaukee into a profitable organic farming business. He received a MacArthur Foundation genius grant in 2008 because he trained and mentored inner city youth in the art of urban agriculture.

Many others and I left the farm tour feeling inspired. I saw that small farms provide quality food in a way that sustains the life of the farmer, customers, and the land. The market for locally grown organic food is far from being saturated. Perhaps more of us should consider making it a go.

Fast Plants

In video on September 14, 2010 at 6:48 pm


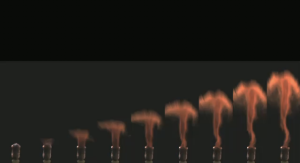
see this fascinating video- High speed camera capture of moss sporophytes exploding.

see the article in Science magazine

Microscopic View of Developing Flower

In microscopy, science plants on September 12, 2010 at 11:24 pm

dissection of a radish flower

A radish flower dissection is shown left. The stamen are the pollen carrying organs. On the radish flower shown, the stamen are the two yellow objects on either side of the sticky female pistil.

The picture below is a light microscopic image taken at 100x of the very tip-top of the stem on a flowering tobacco plant. You can see the young petals surrounding the developing stamen. The dark red staining is from an antibody to a transcription factor involved in plant growth.© 2011 Sharon Settlage.  All rights reserved.

Light Micrograph of developing tobacco flower, by S. Settlage. Please click the image to see enlarged view!
Learn more about flowers and pollen.

scanning electron microscope view of pollen grains

Beauty in a leaf

In microscopy, science plants on September 12, 2010 at 7:35 pm

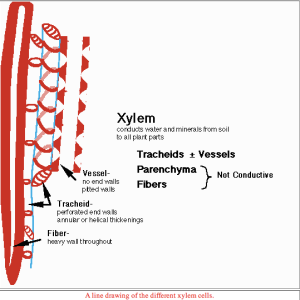
Xylem showing spiral rings of tracheids as shown in real life photograph below.

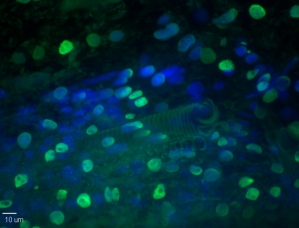
Fluorescent microscopy shines a single wavelength of light onto an specimen, then captures the glow that is produced. Here nuclei are bright blue, a nuclear protein is bright green and the curly cues are the auto-florescent cell walls of xylem tissue. In the diagram above you can see a cartoon of the tracheid, that is the water carrying pipe in plants. Click the image below to see a larger view of the spiral shaped cell wall thickenings. © 2011 Sharon Settlage.  All rights reserved.

Fluorescent micrograph of cross-section from a tobacco leaf. Photo by Sharon Settlage.

Hello world!

In science plants on September 12, 2010 at 2:21 pm

This is your opportunity to view and learn more about the amazing things that plants do. I will be including some microscopic images that I took, but never published in my studies, at North Carolina State University. Plant microscopy can be beautiful, even when you don’t know what you’re looking at. For those that are interested, I’ll provide some detail about what you are looking at. Aside from microscopic images there are just so many unusual and intriguing things to show about plants that I will compile here for you to see. I’ll keep up with scholarly articles on plant antics, with a preference for showing articles and images that non-scientists can understand. Although much scientific research is way too complex for anybody but the experts to grasp, I believe that there are still many simple experiments to expose. Enjoy!